Interfacing LM35 with Arduino in Proteus ISIS
If you like to improve objects around you and make them more interesting, using electronics is one way of turning static objects into useful and fun gadgets. One of the tools that will help you do exactly that is Arduino.
So, in this tutorial I’ll show you how to interface Arduino UNO with the temperature sensor LM35 on ISIS Proteus. Its a perfect project if you are a beginner and have just started testing Arduino projects.
First of all, lets have a quick look on ‘ what LM35 is ? ‘
Introduction of LM35 Temperature sensor
LM35 is an electrical sensor used to measure the temperature of its surrounding environment. It’s output is an electrical signal, and its input is the temperature which it detects.
This sensor possess low self heating and does not cause more than 0.1 oC temperature rise in still air. Besides, it’s circuitry is sealed, it is not subjected to oxidation and other processes.
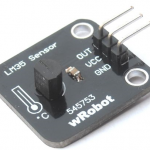
The image given below shows the physical appearance of LM35 :
 as you can see LM35 is a 3 pin IC. The following image shows its diagram :
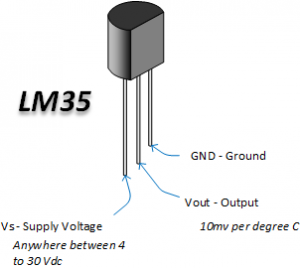
× the first pin is used for supply from source.
× the second pin is the data pin. It is used to send the data (electrical signal generated from the temperature measured) to the external circuit.
× the last pin is for GND.
Let’s now try to connect LM35 with Arduino micro controller.
Connection diagram
The components are connected as shown in the following figure.
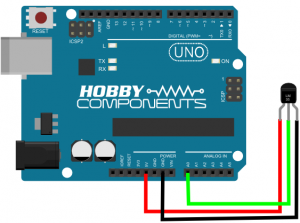
× the first pin is connected to +5V of Arduino board
× the output of the sensor is connected to the ‘A0’ pin of Arduino board.(‘A0’ pin receives analog signal from external resource)
× the last pin is connected to the GND pin of Arduino board.
After connecting your circuit, you will need to upload some code in the Arduino UNO board. But a step comes before, which is interfacing the sensor with Arduino on Proteus ISIS. This allows us to check the values measured by the sensor on a virtual terminal.
Interfacing of temperature sensor LM35 with Arduino in Proteus ISIS
First, desgin the same circuit in Proteus software and add the virtual terminal as shown in the following figure :

Then, you need to upload an hex file to Proteus. It is the file generated when you compile this code:

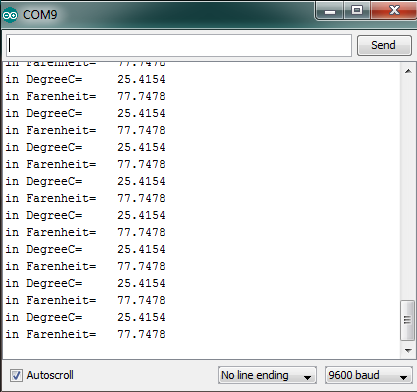
Now you need to run the simulation and you will get results as those shown below:
That was all about making an LM35 and Arduino Proteus simulation. It’s a very simple lab that every beginner can perform.
Let me know in the comments if you find trouble at any level performing the lab or if you suggest any other IoT tutorial.


Recent Comments